Flattening out coffee filters may seem like an odd start to a DIY project, but in fact, it leads to a world of charming and creative possibilities. This type of DIY is becoming increasingly popular among crafting enthusiasts because it’s not just economical, but also adds a unique, whimsical flare to home decor. Coffee filters, though originally intended for brewing, have taken a leap into the arts and crafts arena as they can be manipulated into a variety of shapes, textures, and colors. Undertaking such a project is appealing because these commonplace items transform into intricate pieces, instilling creativity and personality into one’s home ambience.
The coffee filter craft can provide a gentle, organic touch to a room. Since the filters are white and delicate, they marry well with a minimalist aesthetic, reinforcing a clean and serene atmosphere. For a bohemian or eclectic home, dyeing the filters can add a splash of color and a handcrafted texture that warmly fills the space. These creations can hang as a mobile in a corner, cascade down a wall as art, or envelop a light fixture, emitting a soft, patterned glow. The versatility of the coffee filter crafts allows them to complement various styles like rustic-chic when paired with natural elements or to add cheer to a child’s room due to their whimsical form.
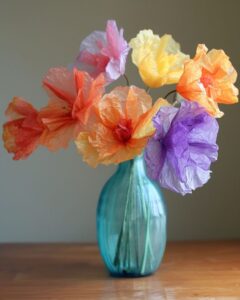
Enchanting Coffee Filter Flowers

Materials:
– Coffee filters
– Scissors
– Food coloring or watercolor paints
– Small bowls (for dye)
– Water
– Baking sheets
– Wire (floral wire works well)
– Wire cutters
– Floral tape
– Twigs or branches (optional)
– Scissors
– Food coloring or watercolor paints
– Small bowls (for dye)
– Water
– Baking sheets
– Wire (floral wire works well)
– Wire cutters
– Floral tape
– Twigs or branches (optional)
Directions:
1. Begin by flattening out the coffee filters. Lay them in a single layer and use the edge of a ruler or your hands to smooth out any folds or wrinkles.
2. If adding a pop of color, mix food coloring or watercolor paints with water in small bowls. Dip the filters in the dye until the desired hue is achieved. For an ombre effect, dip each filter to varying depths.
3. Lay the dyed filters on baking sheets and allow them to dry completely.
4. Once dry, fold the filters into quarters and cut petal shapes around the edges, experimenting with different sizes and designs for variety.
5. Stack multiple layers of your shaped filters to form the flower, pinching at the base to secure them together.
6. Cut a piece of wire for the stem, wind the base of the flower onto the wire, and secure it by wrapping with floral tape.
7. If desired, attach the flowers to twigs or branches using more floral wire and floral tape for a more natural arrangement.
Final Looks


Variations & Tips:
– For added texture, scrunch the filters before dipping them into dye or as they dry after coloring.
– Experiment with different petal shapes and layering techniques to create a variety of flowers, such as roses, peonies, or daisies.
– Enhance the bouquet with greenery by crafting leaves out of green coffee filters or incorporating real foliage.
– For a permanent display, consider hot gluing the finished flowers onto a wreath form or in a shadow box.
– As an environmentally friendly tip, seek out used coffee filters that have only been touched by water and coffee, and ensure they are thoroughly cleaned and dried before starting your project.